Monday, September 25, 2017
Friday, May 19, 2017
Macademia Hugging Bears
I chanced upon some hanging cookies that were so adorable. They hang from cups and I thought it would be lovely to make these special cookies. Sadly, I bought a few cookie cutters that were too small and failed to hang them. Finally, I found the right sized cookie cutter, but the cookies refused to hang. *.*
But still needed to make them cute, so I made the bears hug a macadamia nut each, adorable much. Here the simple cookie dough that did not make the hanging mark, but they still can hug. :)

Ingredients
200g cake flour
150g butter
90g powdered sugar
80g almond powder
1 egg
1tsp vanilla extract
pinch of salt
Optional flavouring
instant coffee
pandan paste
strawberry emelco
macadamia nuts
Method
1. Preheat the oven at 150 degree celsius. I lowered the oven temperature to avoid over browning.
2. Cream the butter and the powdered sugar together till light and fluffy.
3. Add the egg and whisk to combine.
4. Whisk in the vanilla extract.
5. Sift in the almond and mix well.
6. Sift in the cake flour and salt and mix well.
7. Divide the dough in as many portions as you have the different flavouring. For me, I added instant coffee, pandan paste and strawberry emelco. Knead in the flavour and wrap with a cling film in a disc shape and chill in the fridge for at least 30 minutes.
8. Roll the dough out and cut with desired cookie cutter.
9. Make the cut bears hug a macadamia nut (optional).
10. Bake the cookies in a the oven for about 20 minutes or when the cookies have become golden brown. Allow to cool completely before storing in an airtight container.
I think the design is adorable and I will try the hanging cookies again. I hope to make hangings ones, it will be a good conversation starter. For now, my bears will hug a nut each.
What's baking in May?
So half of May has gone by and I've baked a few Watermelon Strawberry Rose Cakes and Lychee Rose Cakes. Inspirations are dripping in and I've gotten my hands on some sourdough starters, so here's what I'm dying to bake for the rest of the month.
- Sourdough from the sour dough starter that my SIL gifted me with.
- Sesame flavoured cake because I bought a jar of sesame spread that I bought in Malaysia, hoping it is similar to sesame paste. Sesame paste is so expensive in Singapore.
- Unicorn themed anything because I got inspired by some really pretty unicorn bakes.
- Some bakes that will use up the yolks collected from the watermelon cakes.
I think that should use up most of the time I have for baking in May. I hope I get to try everything I plan to do. Sourdough tomorrow! I hope it works!
Monday, May 15, 2017
Orange Sponge Cake
I wanted to use up the cheese and bake a cheesecake for the SIL's birthday, but I don't have enough time for the cake to set overnight, so I chose a simple orange Sponge. Easy peasy and the zest lends a nice citrus fragrance to the cake. The crumb is also very delicate and soft, we all love the cake.


Ingredients
100g orange juice (about 2 oranges)
90g cake flour
70g oil
6 large egg yolks
1/2 tsp salt
Zest of 2 oranges
100g caster sugar
6 egg whites
1/4 tsp cream of tartar
1. Line the base of a 8 inch cake tin. Preheat the oven at 155 degree.
2. Sift the flour and salt together.
3. In a large mixing bowl, whisk the yolks and oil together till combined.
4. Add the zest and juice and whisk till combined.
5. Whisk in the flour and set aside.
6. Beat the egg whites till frothy and add the cream of tartar. Add sugar 1 tablespoon at a time and beat till firm.
7. Add in a third of the meringue and whisk into the egg yolk mixture. You don't have to be too gentle at this point.
8. Add the rest of the meringue and fold the meringue gently into the egg mixture till combined.
9. Pour the batter into the prepared pan and place the pan in a tray of boiling water.
10. Bake in the preheated oven for about 70 minutes.
11. Once out of the oven, invert the cake into a non-stick pan when the cake starts to pull away from the sides of the cake pan.
12. Reinvert the cake on a cooking rack and allow to cool completely.
The cake is really spongy, fragrant and soft. I will bake it again soon!
Wednesday, April 12, 2017
Thai Milk Tea Curd
I had too many egg yolks left from a previous bake and also have some Thai tea powder left, so I thought I'll experiment with both and see if Thai milk tea Curd works. It's been in the fridge for a few days and it set beautifully.
Ingredients
180g caster sugar
113g unsalted butter at room temperature
6 eggs yolks
A cup of milk
3 tbsp of Thai tea powder
1. Heat the milk and tea powder till boiling and sieve to get the liquid.
2. Whisk the egg yolks and caster sugar in a metal bowl till light and fluffy.
3. Add half a cup of the milk tea and whisk to combine.
4. Place metal bowl of yolk mixture over a pot of simmering water and heat, whisking continuously.
5. Take the bowl off the heat once the mixture thickens.
6. Add the butter slowly, whisking to combine.
7. Pour into a jar and place a cling film over the surface and allow to cool.
8. Store in fridge and this can be kept for about a week.
Monday, April 3, 2017
What's baking in April 2017?
I'm so short of time, but I'm going to find time to bake
1. Easter chiffon eggs.
2. Thai milk tea anything cos I just made some Thai milk tea Curd from leftover egg yolks and I've got like 10 more yolks to use up.
3. Hanging cookies.
4. Steamed buns to use up the lotus paste.
4 item in a month is manageable, right? Only I get distracted along the way and bake other things.
Time.. I need more time...
Wednesday, March 15, 2017
Yuzu Curd
Having bought a bottle of expensive Yuzu juice from a shop specialising in Japanese product, I baked some Japanese Cheesecakes and when I said some, I meant like 5 cakes over a weekend. The cheesecakes look rather plain and so I made some Yuzu Curd, first to decorate the plain looking cakes and secondly to stretch the Yuzu juice. It turned out nice and aromatic.
Ingredients
100g caster sugar
75g unsalted butter
3 egg yolks
2 eggs
Zest of 2 lemons (zest of Yuzu fruit if you are able to lay your hands on this very expensive fruit)
3.5 tbsp of Yuzu juice
1. In a heat proof mixing bowl, rub the zest into the caster sugar.
2. In a big pot, boil water (about an inch deep) and lower the heat so the water is simmering.
3. Add the eggs and yolks to the mixing bowl and place the mixing bowl over the simmering water and cook the mixture, whisking continuously.
4. The Curd is ready when it thickens to a consistency resembling yogurt.
I used this to decorate the many cheesecakes I baked for a few birthdays over 1 weekend. I really like the refreshing taste and zing of the Yuzu.
Matcha Scones
I needed something to eat with the clotted cream, so I made matcha Scones. I needed to use up the matcha powder anyway. They turned out nicely moist and hearty. Best eaten with jam and of course the clotted cream.


Here's the recipe.
Ingredients
235g all purpose flour
90g unsalted butter (cubed and cold)
90g whipping cream
50g caster sugar
10g green tea powder
1 egg
1 tbsp baking powder
1/4 tsp salt
1 tbsp milk for glazing
1. Preheat the oven at 200 degree celcius.
2. Sift flour, green tea powder and baking powder together.
3. Add sugar and salt, whisking to combine.
4. Add the cold butter and rub the butter into the flour using the tip of your fingers. The resultant product should resemble coarse sand.
5. Add the egg and whipping cream and mix till just combined.
6. Roll the dough out and cut out 5cm rounds using a cookie cutter.
7. Leave to rest on a baking tray for 30 min.
8. Brush the top of the scones with milk and bake in preheated oven of 200 degrees for 13-15 minutes.
I made these delicious Scones to go with jam and painstakingly made clotted cream. It was delicious!


Feels like a classy high tea session already.

Freshly baked and smelling yummy

Gave them some light for 'good skin'

Preparing them to be packed and shared

One more
Ingredients
235g all purpose flour
90g unsalted butter (cubed and cold)
90g whipping cream
50g caster sugar
10g green tea powder
1 egg
1 tbsp baking powder
1/4 tsp salt
1 tbsp milk for glazing
1. Preheat the oven at 200 degree celcius.
2. Sift flour, green tea powder and baking powder together.
3. Add sugar and salt, whisking to combine.
4. Add the cold butter and rub the butter into the flour using the tip of your fingers. The resultant product should resemble coarse sand.
5. Add the egg and whipping cream and mix till just combined.
6. Roll the dough out and cut out 5cm rounds using a cookie cutter.
7. Leave to rest on a baking tray for 30 min.
8. Brush the top of the scones with milk and bake in preheated oven of 200 degrees for 13-15 minutes.
I made these delicious Scones to go with jam and painstakingly made clotted cream. It was delicious!

Enhancing the colour to make them look for appetizing. They tasted really good.
Friday, March 10, 2017
Sunday, March 5, 2017
Clotted Cream
The last trip to Langkawi inspired this clotted cream. We had the high tea at St. Regis and we thought the cream served on the side with the scones was delish and apparently it was clotted cream. I went online to research on clotted cream and there are a number of ways to make it. The most relaxed way seems to be the oven method. Simply pour 2 cups of cream into a shallow dish and place in the oven and bake for 12 hours in a preheated oven at the lowest temperature. Easy as pie.

Ingredients
2 cups of heavy cream
1. Preheat the oven at the lowest temperature.
2. Pour 2 cups of heavy cream into a glass shallow dish with a big surface area.
3. Bake for 12 hours, overnight.
4. Carefully remove the cream from the oven after 12 hours being careful not to agitate the cream.
5. Leave to cool for about 30 minutes, cover and leave in fridge for another 12 hours.
6. Use a spoon and carefully collect the luscious clotted cream formed.
7. Gently stir till smooth and creamy and store in a jar. This can keep in the fridge for up to 5 days.
8. For the remaining cream in the dish after collecting the clotted cream, use them to make scones.
After patiently waiting for 12 hours, here's the precious clotted cream.

I had the clotted cream with matcha Scones and maybe because they took 12 hours, I savoured every bite. It is lovely, only we'll need some nice scones to go with the clotted cream.
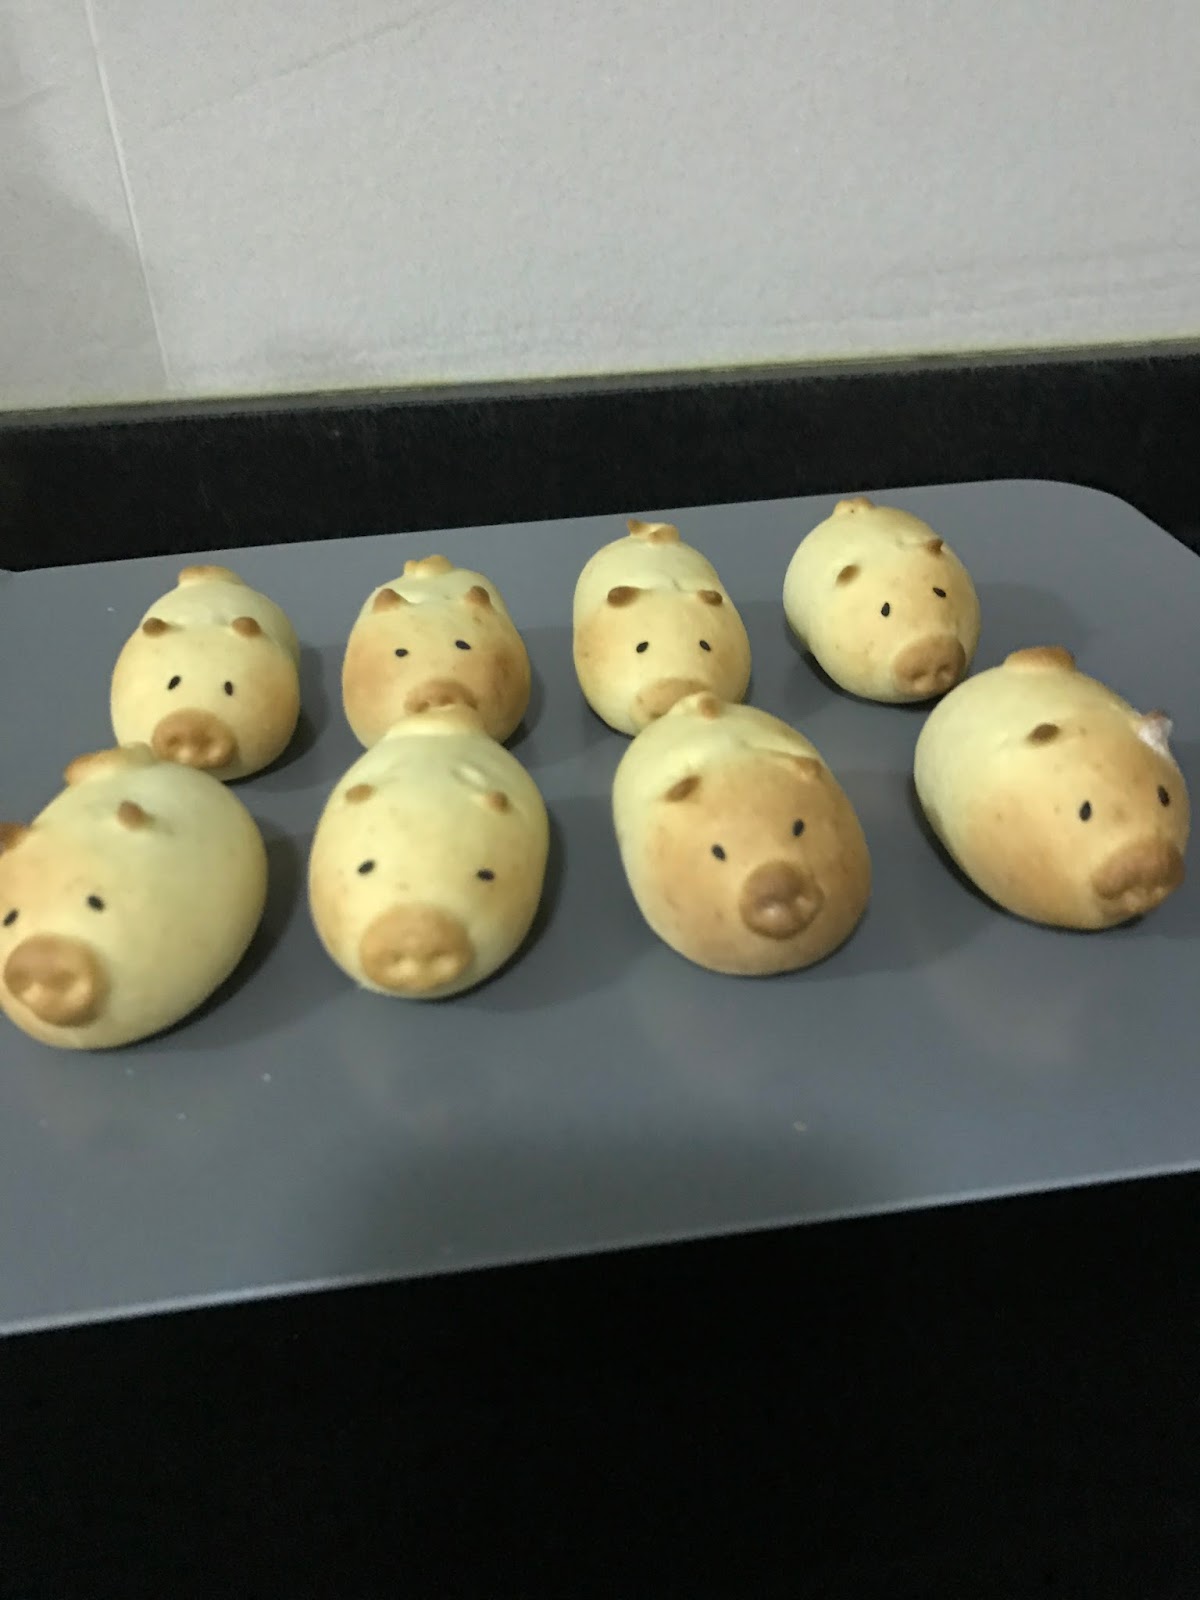
Japanese light snack- 莲蓉猪
Baking calms me and helps me to relief some stress. Crazy busy recently and I can only afford to bake these easy peasy Japanese nice snack. They're quite easy to bake, try them.

I lined them up and gave them good skin with the lighting. They look ubly cute!

Ingredients
120g white lotus paste (I used sugar free ones)
115g cake flour
99g condense milk
25g egg yolk
2.5g baking powder
Black sesame seeds
1. Whisk together condense milk and egg yolk.
2. Sift in the flour and baking power and mix till combined.
3. Flatten the dough into a disc and chill for about 30 minutes.
4. Meantime, prepare the lotus paste, making 15g rounds.
5. Divide the dough into 25g rounds.
6. Wrap the lotus paste in the middle of the dough and they are ready to be shaped.
7. Make 'v' cuts at the sides and pull out the ears.
8. Using the extra dough, make the nose, using the rounded side of a satay stick to make the nostrils. Finish with sesame seeds as eyes.
9. Make the tail as well.
10. Bake the light cake in a preheated oven of 150 degree celcius for about 20 min.


Marshmallow Chocolate Brownies
Was asked to bake for a family gathering and I only had time to bake simple stuff. Decided on a fast Butter Cake, which was tested earlier on. I wanted something for the youths too, so I thought chocolate brownies would be well received. I had some marshmallows left, so I added some and I thought the amount of sugar stated in the recipe was too much, so I boldly halved the amount. With Christmas and the new year just over, the chocolates I received came in handy and using them in the brownies meant no wastage later on because we hardly eat chocolate. Genius! Here's the recipe.


(Makes a standard tray)
Ingredients
300g all purpose flour
300g caster sugar
260g brown sugar
250g chocolate (I used good quality dark chocolate, chopped)
150g cocoa powder
350g unsalted butter (melted)
6 eggs
About 10 big marshmallows
2 tsp vanilla extract
Method
1. Line the baking tray with parchment paper. Preheat the oven at 160 degree celcius.
2. Melt the butter and leave to cool.
3 Sift the flour and cocoa powder together.
4. Mix the sugar, flour cocoa powder mix, vanilla extract and melted butter together till combined.
5. Add the chopped chocolate and Marshmallows and fold into the mixture till combined.
6. Bake in preheated oven of 160 degrees for about 45 minutes and leave to cool before slicing and eaten warm or cool completely to be stored in airtight container.
I quite like the contrasting textures of the soft marshmallows to that of the crispy exterior and gooey chocolate center. I'll torch the marshmallows the next time. Think it'll be called s'mores brownies.

Till next time...
Monday, February 20, 2017
Saturday, February 11, 2017
Just for laughs
I went to collect race pack for a run and had a hilarious encounter.
Counter boy 1: wait ah I give you one more shirt.
Me: oh! Got 2 shirts ah?
Counter boy 1 to boy 2: eh! Go get 1 more shirt!
Counter boy 2: there! Got already what!
Counter boy 1: get one more la! *pointing to computer screen* It says 2 XS....
Me: nearly rolled on floor 😂
Counter boy 1: wait ah I give you one more shirt.
Me: oh! Got 2 shirts ah?
Counter boy 1 to boy 2: eh! Go get 1 more shirt!
Counter boy 2: there! Got already what!
Counter boy 1: get one more la! *pointing to computer screen* It says 2 XS....
Me: nearly rolled on floor 😂
Sunday, February 5, 2017
Mandarin Orange Butter Cake
Happy Chinese New Year! It's a busy and working new year, but all's good. Now that I have so many mandarin oranges on the table, which either get eaten or thrown away, I'll bake some mandarin oranges themed desserts. Did some research and decided on a Butter Cake with a mandarin orange twist. Haven't posted recipes for eons, so here's one.

Ingredients
230g unsalted Butter
200g self raising flour
150g caster sugar
60 ml mandarin orange juice
4 egg yolks
1 tsp salt
1 tsp vanilla extract
4 egg whites
50g caster sugars
Method
1. Preheat the oven at 170 degree celcius and prepare your cake pan. Mine had a removable base so I didn't bother greasing or lining the pan.
2. In a mixing bowl, cream the butter with 150g of caster sugar until light and fluffy. *I did not use machine, used a wooden spoon instead.
3. Add the salt and cream till smooth.
4. Add the egg yolks one at a time and mix to combine.
5. Add the vanilla extract and the orange juice and mix till combined.
6. Fold in the flour gently in 2 additions.
7. In a mixer, whisk the egg white till foamy and add the sugar one at a time, beating till stiff peak.
8. Add in a third of the meringue and whisk into the flour mix. ( there is no need to be too gentle at this stage)
9. Add the rest of the meringue in two additions, folding the meringue into the flour gently till combined.
10. Pour batter into prepared cake pan and bake at 170 degree for about 45 min. At the last 15 min, adjust temperature to 150 degree and 140 in the last 5 min.
11. Check readiness of the cake by testing with a skewer, if the skewer comes out clean, the cake is ready.
12. Once cooked, allow the cake to rest for about 2 minutes before unmolding from pan and allowing it to cook completely.
13. Once cool, cut the cake into squares and decorate with mandarin orange segments
The cake looks every bit festive and tastes quite good.
Will find time to write more. Stay positive!!
Monday, January 23, 2017
January 2017
So the year's started and before we know it, it's almost February. It may be a busy start, I hope that I'll constantly see the angels sent to protect me and see the smiles of the young lives I come into contact all day.
The blue's over and it's time to count my blessings and learn to stop a little bit and take time to smell the roses. Let's get inspired, keep calm and bake on.
Baking more pineapple rosettes
Baked almond Florentines
Oh Gosh! It has been so crazy busy that I'm not inspired at all. Oh well...
The blue's over and it's time to count my blessings and learn to stop a little bit and take time to smell the roses. Let's get inspired, keep calm and bake on.
Baking more pineapple rosettes
Baked almond Florentines
Oh Gosh! It has been so crazy busy that I'm not inspired at all. Oh well...
Subscribe to:
Posts (Atom)