Sunday, June 28, 2015

Almond Crusted Orange Cake

Been feeling under the weather for a while and I think I need a major clean up in life, clean out the junk and the negativity and inject some life and joy so that they flow from within. Never lose hope in life and hang on that faith that we can face tomorrow because He holds tomorrow and He holds my hands.

An orange cake with almond topping to brighten my life a little. Cheer up!

This recipe was taken from the Nasi Lemak Lover. She's my new found inspiration. 


(Makes a standard loaf tin)


For the orange cake
125g cake flour
125g unsalted butter at room temperature
90g caster sugar
2 eggs
2 tbsp fresh orange juice
zest of 1 orange
1 tsp baking powder
1 tsp vanilla extact

For the almond topping
45g flaked almond
25g honey
10g butter
splash of orange juice
spinkle of seasalt


1. Preheat the oven at 170 degrees and line loaf tin with baking paper. Sift the baking powder and flour together and set aside.

2. Beat butter and sugar till light and fluffy. (I used a hand whisk because I was too lazy to use the machine.)


3. Add the eggs one at a time, making sure the eggs are well combined with each addition.


4. Add the vanilla extract and fold in half the flour. Add the orange juice and zest and fold in the rest of the flour.


5. Pour the batter into the lined loaf tin and spread to level the batter.


6. Bake in preheated oven of 170 degrees for about 30 minutes. The cake is ready when a skewer comes out clean when inserted into the middle of the cake.

7. Put honey, butter, juice and almond into a saucepan and heat to make sure the almonds are coated with the honey and butter mixture.


8. Spread the almond topping on top of the cake and sprinkle sea salt sparingly. (Sea salt creates that nice balance with the sweet honey.)


9. Bake for 10 minutes in oven at 180 degrees till the almonds becomes crispy and the honey caramelise.


It was scrumptious and the orange zest and juice perfumed the cake, leaving a nice, lingering fragrance in the mouth. The almond topping is addictive and I can really have it on its own. really nice!


In peace I will lie down and sleep, for you alone, Lord, make me dwell in safety. (Psalm 4:8 NIV)

Saturday, June 27, 2015

Red bean Sponge Cake

I'm experiencing major inertia to start work and so, to motivate myself, I baked a simple red bean sponge cake for a family gathering. Concerned that everyone will be too full to eat, I intended to bake a small one and it turned out really small, it could only be cut into 3 small pieces. Oh well, I'll bake a bigger one the next time. 

(Makes a 3 layered rectangular cake)

To make the sponge

70g caster sugar
40g cake flour
25g melted butter
3 eggs (separated)

To make the redbean filling

160ml whipping cream
1tbsp icing sugar
red bean filling (about 4 tbsp)


1. Preheat the oven at 180 degrees and line the baking tray (23cm x 33cm).

2. Beat the egg white and sugar till stiff peak.


3. Add the egg yolks and beat for a minute at low speed till combined.


4. Sift the flour over the mixture and fold to combine.


5. Add the melted butter and fold gently to combine.

6. Pour the batter onto prepared tray and bake in preheated oven of 180 degrees for about 10 minutes.

7. Turn the sponge out when ready and allow to cool on cooling rack.

8. Prepare the filling, whipping the cream and the icing sugar until soft peak. Fold in the red bean filling.

9. Cut the cooled sponge into 3 equal portions.

10. Spread red bean cream on one layer.


11. Layer on a second layer, topping with red bean cream again.


12. Layer on a third layer and decorate as desired. I did a simple decoration of cream and red bean filling.


It turned out like an Asian opera cake. I'll try a bigger cake next time. Till then, this recipe is light and ideal for red bean lovers.


Thursday, June 25, 2015

Oreo Cheesecake

It's a good friend's birthday today and we'll only be meeting her tomorrow, so I had time today to bake something for her. She's not a dessert fan, but I think cheesecake should be neutral enough for her. Did a bit of a research on oreo cheesecake recipes and I'm not inclined towards to non-baked ones, shall do a baked one. Hope she likes the cake.


(Makes a 16 cm cake)

For the oreo cheesecake
60g plain yogurt (supposed to use sour cream, but I was too lazy to travel all the way)
250g cream cheese
50g caster sugar
12 + 6 oreo biscuits (with filling)
2 tbsp butter melted
1 egg
1 egg yolk
1tsp vanilla extract

For assemble and decoration
180g whipping cream
6 oreo cookies (halved)

1. Preheat the oven at 140 degrees.

2. Smash 12 oreo cookies using a rolling pin in a bag. (It's really therapeutic.)

3. Add the butter to the smashed oreo and mix to combine.


4. Pour the oreo mixture into lined base of cake tin. Spread evenly and use a spoon to press into the base. Place in fridge to set while the cheese filling is prepared.


5. Beat the cream cheese in a mixing pour till soft and fluffy.


6. Add the sugar and whisk to combine.


7.  Add the egg and egg yolk and beat till smooth.


8. Stir in the yogurt and the vanilla extract.


9. Chop the 6 oreo cookies roughly and stir into the cheese mixture.


10. Pour the cheese mixture into the cake tin where the oreo base has set.

11, Bake in preheated oven of 140 degrees for about 40 minutes. 

12. The cake is ready when the side is set and the centre is still jiggly. (Mine seems to be like that, fingers crossed.) Once baked, remove from oven and leave to cool completely on cooling rack.


13. Whip the whipping cream till stiff peak.


14. Spread enough to cover the top of the cake.


15. Remove cake from tin and pipe the rest of the cream and decorate as desired. I halved the cookies and placed them all round.


I am very satisfied with the appearance, but a little unsure if the inside is fully cooked. I hope it is and that it will taste as good as it looks. 40 minutes will be enough to fully bake the cake and it tasted good! 


Monday, June 22, 2015

My First Lesson for Kiddos

I'm very excited about the lesson I'm going to conduct for a few kids. An ex colleague asked if I'd be interested to teach her kids to bake and I thought, why not? I even had the lesson plan written out hehe. I hope everything will run smooth and fun! And I hope this will be many more lessons to come. :)

Look! These are my samples, trying out before the actual activity. 


I hope the kids will have fun. :)

And they had fun! These are their work.


They are seriously at work. 

I had fun and they were surprisingly engaged. I thought boys would find it too 'gu niang' but they were having fun. 

Sunday, June 21, 2015

Ice-cream without machine

I have always wanted to make ice-cream, but investing in an ice-cream machine is not ideal because my house is not exactly big. This recipe is great! No machine needed! I made green tea and red bean ones. :)

(Makes 2 pints)

For ice-cream base
450ml whipping cream
395g condense milk (a can)

For red bean flavour
4 tablespoons of cooked red bean

For green tea flavour
20g green tea powder

1. Beat the whipping cream to soft peak.


2. Add the condense milk and beat to medium peak.


3. Add the red beans and green tea powder and fold to combine and put into containers. I added red beans to the green tea too.

4. Freeze to set.


The macha azuki flavour was a bit bitter because I added more than 20g, but it was just nice when eaten with the red bean one:) I'm thinking of making salted caramel one. :) 

Saturday, June 20, 2015

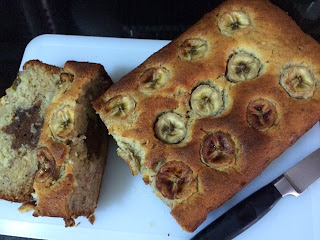
Banana Star Surprise Cake

This has been hiding in my draft since March and since I'm on holiday and there is nothing to post, I'll post this. It's easy to bake and the star surprise is just an optional step. My chocolate stars are ready! I freezed them overnight and they are ready to go into the middle of my banana cake, I hope they turn out fine! :) there are many recipes for banana cake and in the search for the perfect banana cake, I have baked with quite a few recipes. Here's one which is think is really not bad.


(Makes a standard loaf tin)

For the chocolate stars

Chocolate Pound Cake


For the banana cake

200g all purpose flour
135g sugar
135g unsalted butter at room temperature
90g whipping cream
3 large bananas mashed
1 large banana (sliced to decorate)
1 egg
1 tsp vanilla extract
0.5 tsp baking powder
0.5 tsp baking soda
a pinch of salt


1. Line the loaf tin with baking paper and preheat the oven at 180 degrees. Sift flour, baking powder, baking soda and salt together and set aside.

2. Beat butter and sugar together till light and fluffy.


3. Add the egg and vanilla extract and beat till smooth.


4. Add the mashed bananas and beat to combine.


5. Add a third of the flour and fold to combine, then add half the whipping cream and fold. Then add half of the remaining flour, fold and then the rest of the whipping cream folding to combine. Add the rest of the flour and fold to combine.


6. Pour the batter into the loaf tins and decorate with sliced bananas. Bake at 180 degrees for 45 minutes. Insert a skewer into the middle of the cake and if the skewer comes out clean, your cake is ready.

7. Cool on a cooling rack.

*I hid my chocolate stars in the middle of the cake so that there will be a surprise when the cake is cut. I'll try with more complicated shapes if this is successful.*


I'm very intrigued with the stars center and I think I'll be experimenting with more challenging cake center. Heart shape, maybe?

By the way, my niece gave a rating of 8 out of 10 for the end product, not bad I think.


Who is wise and understanding among you? Let them show it by their good life, by deeds done in the humility that comes from wisdom. (James 3:13 NIV)